This is an old revision of the document!
Restock Warehouse
This guide covers restocking a warehouse.
Step 1 - Delete any open PO's from last month's restock orders that never actually got ordered
- Every once and a while you will find that you may just get to busy and not have enough time to get all the PO's ordered or picked up from local vendors. If this does happen, it is best to delete this PO prior to ordering this months restocks, that way when you do the restock for this month all the product from one given vendor will be on one PO rather then 2 different PO's, and it will be easier to keep track of.
- There may be open PO's that you can't remember whether you ordered them or not. If that is the case, you can run the PO Drilldown report for that specific PO in question and look into further details.
- To do this go into VP Purchase Order Reports, and double click on the PO Drilldown report.
- Enter the PO number, and launch the report
- When the report comes up, double click on the PO to drill down in the report
- The first double click drill down will take you into the line item detail of the report, from there you can quickly review Current Cost, Invoiced Amount, and Remaining Amount. If the remaining amount is equal to the Current Cost plus Sales Tax Column then you know we have not been invoiced anything on the PO as of yet.
- The next step is to double click on a few of the line items and at that level you can verify whether or not inventory has been received in on that PO. If you find nothing received and nothing invoiced it is fairly safe to assume it was never ordered in the first place, and as a result can be deleted and that way it will be ordered again on your next restock order.
- For the PO's that were never ordered and you are going to delete, you open up PO Purchase Order Entry, create new batch and then in the top left you click on “File” and select the “Add Purchase Order…..” select the purchase order you want to delete and hit add to batch, when it asks you if you want to add all the line items, click yes, next it will ask you if you want to add any other PO's to the batch, click yes if you have more that need deleted and No if you are done.
- Once the PO's have loaded into the batch, change the “Action:” drop down in the top portion of the form from “C-Change” to “D-Delete”
- Once you have done that for each PO that you loaded into the batch, you are ready to click “File” and select “Process Batch” “Validate” & “Post”.
Step 2 - Cleaning up the remaining "Back Orders"
- Inside of Vista, go to “Inventory” click on Programs
- Open IN Location Materials
- Go to the grid view and filter by the Warehouse that you are working on reordering for.
- Click on the header column titled “On Order” to sort the list accordingly
- Then clean up any negatives, that don't have a pending return on them, by changing the “On Hand” Qnty to “0”
- Next, add in a filter for “>0” in the filter bar, and confirm that all items showing on order are on active/open PO's and still coming in from vendors. You can hit “F4” in that field on every item with a qnty higher then “0” to see which PO they are on. Any that are not on active PO's, DO NOT JUST OVERRIDE THE NUMBER BY TYPING “0” unless there is no PO showing.
- Instead go to “Purchase Order” → Programs, click on “PO Close”, create a new batch.
- Once it opens, click the “Update” button, to see all open PO's.
- If desired PO does not show up then it likely means that the “Received Amount” and the invoiced amount do not match. To find out, go to “Purchase Order” → Reports, and run the “PO Receipts Vs Invoiced Exception Report”.
- Next correct the discrepancy, by asking Amanda(AP Gal) to push through the invoice for the outstanding qnty's or go into PO Initialize Receipts, to reverse the entry if they were never actually received.
- Once Received and Invoiced qnty's match run the PO Close program again and they should now show up.
- Only run the PO Close program on PO's that are no longer active, or incoming. If you are unsure, call or email the vendors to check on the back orders. Delete any active PO's from the PO Close list prior to clicking the PO Close Button and processing the batch
- Once you have only items that are still incoming and on active PO's showing in the “On Order” column in the “IN Location Materials” list, you are now ready to move to the next phase of the process.
Step 3 - Cleaning up the Prior "Restock Requisition's"
- Open “PO Requisition Entry” (If you already had it open, be sure to click the refresh button)
- Now that any un-ordered PO's have been deleted, and all the out standing PO items that are no longer valid have been closed, it is time to clean up the Requisitions.
- Click on the prior Requisitions and delete any line items with a current status of “4-Approved for Purchase” or less. If you don't delete these items they will not show up on any future restocks that you attempt to process.
Step 4 - Getting rid of negative qnty's in the Inventory
- In Inventory → Programs, double click on “IN Adjustment Entry” and create a new batch.
- When the form has opened up. Click the button near the top, that is labeled “Import Negative OnHand”
- If there are any negatives in any of the warehouse it should load automatically in the form.
- Then file & process batch!
- Just to make sure it updated them all, You can open up “IN Location Materials” (if that form is already open, be sure to refresh the grid) and click the “On Hand” header to sort by that, and confirm there are no more negatives showing.
Step 5 - Using up Obsolete or Overstocked items from other warehouses
- Coming soon
Step 6 - Processing PO's for Materials Coming From Vendors
Use this section for RESTOCKING a warehouse by buying material from vendors. Use this section for RESTOCKING a warehouse by buying material from vendors.
PO Requisition Initialization
OPEN the PO Requisition Initialization form and change the fields in bold listed below.

- Initialize Requisition Lines From
- Inventory Low Stock
- Select Requisitions Based On
- IN Company: (Default = Current Company)
- IN Location: Group (Default = Blank)
- IN Location: WW MAIN (Warehouse Name)
- Material Category: (Default = Blank)
- Requisition
- Requestor: YOUR NAME
- Description: A DESCRIPTION
- Populate RQ Lines With
- Ship Location: (Default Blank)
- Vendor: (Default Blank)
- Required Date: Enter the date you expect to be receiving the product by. (This will trigger the email alerts on open backorders.)
- Route: 1-Purchase
- Assign Reviewer
- Reviewer: (Default Blank)
Click the OK button to initialize the requisition.
 Notice the REQ ID then Click the OK button.
Click the Close button for PO Requisition Initialization.
Notice the REQ ID then Click the OK button.
Click the Close button for PO Requisition Initialization.
Your Requisition has now been initialized!!
Using PO Requisition Entry
- Open PO Requisition Entry.
- Select your created entry from first grid (most likely the last line).
- Next click the “Bring in Other Low stock” button and wait just a minute, you should get a notice that pops up on your screen when it is done, that says how many lines were effected.
- Then Click the Column header labeled “Other Units” to sort by that column.
- Review all the effected items, and modify the “Units” column to make and round up to the nearest case qnty's on any items that we normally order by the case. Some may need rounded down. For example if you are ordering 50 2 x 1-1/2“ ABS bushings, and the Other Units column is wanting to add another 3, it makes most sense on a part that is not that common to just round back down to 50, rather then up to 100, given it does not have a high turn over rate.
- Next, Notice how all the Vendor fields are blank? Let's change that!
- Click Import Matl Vendors button.

- Look at those imported vendors (In the PRI VENDOR field)! If there are any blank lines, you may want to fix them by going to “HQ Programs” and opening up “HQ Materials. There find the item that did not pull a vendor into the form, and make sure they have a Default “Make”(Manufacturer) & “Model”(Part number) filled out.
- Once this is done, go to “User Database/Programs) and open the form labeled HQ Manufacturer Pref. Vendor
- Filter the grid, to the manufacturer for that item missing a preferred vendor and make sure to add the Manufacturer(Make) with the appropriate default “Vendor”.(Hint if you don't know which vendor we purchase this product from, then back in the HQ Material form in VP click on the Purchase History tab for this item, and whichever vendor we purchased it from last should be added as the preferred default vendor here in this form HQ Manufacturer Pref. Vendor.
- Now once you have done that, go back to the “PO Requisition Entry and re-click the “Import Matl Vendors” button again and this time it should now fill in the vendor.
- Review which items are coming from which vendors.
- Use F4 if you need to change any vendors.
- When you are done assigning vendors:
- Click the “Erase Attention” button & this will remove the manufacturer from that field (Note: If you do not do this the system will split out a separate PO not only for each vendor but also for each separate vendor/manufacturer combination.)
- Close this PO Requisition Entry form.
- Proceed to the Using PO Initialization step.
Using PO Initialization
- Open the PO Initialization form.
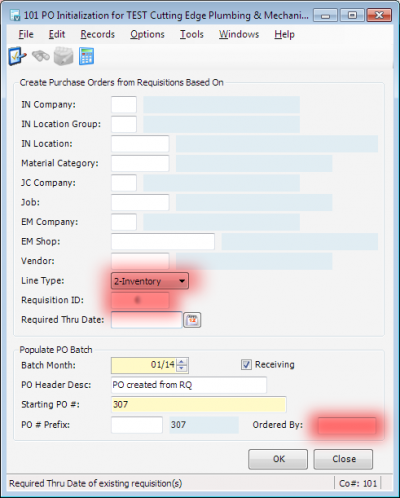
- Change Line Type to “2-Inventory”.
- Use F4 in the Requisition ID field and select the Requisition which you just created/edited.
- Change The “PO Header description” to something like “March Restock” ie “Current Month” Restock.
- Enter your initials into the Ordered By field.
- Click OK to create the POs for this restock!
- Wait for the Batch Created dialog to appear.
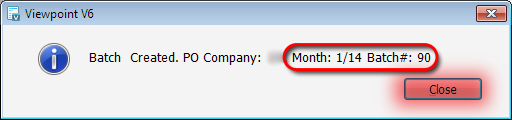
- Note the Month and Batch# in the Batch Created dialog.
- Click OK to close the Batch Created dialog.
- Click the “Update Manufacturers” Button. Wait for the message to pop up that indicates how many rows were updated. Then Click OK &…….
- Close the PO Initialization dialog.
- Proceed to the step Using PO Purchase order Entry.
Using PO Purchase Order Entry
- Open the PO Purchase Order Entry form.
- Select the batch you just created and click OK.
You are now looking at the list of POs created for restocking! The upper portion of the window contains the Purchase Orders, and the lower portion contains the lines on each Purchase Order.
Review & Execute each PO
- In the PO's upper header enter the following
- Expected Date
- PRCo which is “5”
- Ordered By which is “you” :)
- Where applicable enter the Vendor contact.
- Now review each PO to make certain they look correct, and then File & Process the batch.
- Once the batch has been processed you are ready to print them out.
- To do this go to “Purchase Orders” “Reports” and select the “PO Purchase Order Form A1” & print out.
- Next Email out all the ones that go to our plumbing wholesale vendors (Keller/Ferguson/Consolidated, etc.) & then order the ones that need to be done online(Amazon/Staples/Home Depot/Misc, etc.), and run errands to pick up from the in town vendors like Fastenal, L&G Ranch Etc.
- As you email the PO's off to the vendors you will need to request quotes on the restocks unless it was for the product that you already know your pricing because of multipliers.
- Once each PO has been ordered, date and file the printed copy in your “Incoming PO's File”
- Yay!! You are complete with ordering all your restocks for the warehouse!